
 listicle
7 Benefits of Professional Drywall Repair Services
Table of Contents
- Why Professional Drywall Repair Beats DIY
- How to Properly Prep Walls for Painting After Repairs
- Time and Cost Efficiency: What a Drywall Repair Cost Estimate Really Shows
- Expertise and Professional-Grade Tools for a Seamless Finish
- Safety Protocols and Drywall Dust Management
- Long-Term Durability and Increased Property Value
- Handling Complex Damage: Water, Mold, and Structural Issues
- Conclusion
- Frequently Asked Questions
Last Updated: September 14, 2026
Why Professional Drywall Repair Beats DIY
Professional drywall repair delivers a seamless finish, structural integrity, and durability that DIY patching rarely matches. Professional drywall repair delivers a seamless finish, structural integrity, and durability that DIY patching rarely matches.
Drywall repair is the process of restoring damaged wallboard, cracks, holes, and water-damaged sections to a smooth, paint-ready surface. The execution is not simple.
A common mistake is treating drywall like spackle and paint. It is a structural material. Improper repairs leave soft joints, visible ridges, and cracks that reappear within a season. According to the Gypsum Association's guidance on gypsum board finishing, proper joint treatment and finishing standards exist specifically because rushed work fails under normal temperature and humidity swings.
The benefits of professional drywall repair services come down to four things: correct materials, technique, sequencing, and accountability.
How to Properly Prep Walls for Painting After Repairs
Wall preparation after drywall repair determines whether the finished paint looks smooth or shows every patch. The process has a fixed order, and skipping steps is why so many DIY repairs look obvious under paint. It is also where DIY health risks concentrate, because sanding cured joint compound puts fine particulate into the air.
Here is the sequence, with the mechanism behind each step:
- Let joint compound cure fully. Joint compound loses water as it cures and shrinks as it does. Painting over curing compound traps moisture and locks in a surface that will keep moving. Manufacturers print a recoat window on the pail; thin coats dry faster, and humidity stretches it.
- Sand progressively. Start with medium grit to knock down ridges, then finish with fine grit to blend the feathered edge. Skipping the medium pass means sanding longer with fine grit, generating more dust and rounding edges you wanted flat.
- Wipe and inspect under raking light. A dry microfiber wipe removes surface dust that would telegraph through primer. Then hold a work light flat against the wall.
- Apply primer to the repaired area. Bare joint compound is more porous than the surrounding painted wall, so it absorbs paint at a different rate. Without primer, the patch reads as a dull or flashing spot under finish paint, a defect no topcoat hides.
- Match texture before painting. Smooth patches on a textured wall stand out immediately. Orange peel, knockdown, and skip trowel finishes each require a different method and tool.
- Paint corner to corner, not patch to patch. Blending is what hides a repair. Cutting in at the patch edge leaves a visible halo where the sheen changes.
The health step most guides leave out
Sanding drywall joint compound releases fine dust, and the dust is not inert. Cured compound contains crystalline silica, and the OSHA's guidance on respirable crystalline silica in construction treats silica dust as a serious respiratory hazard. The practical implication for a homeowner is simple: sanding a wall in a closed room without a respirator and without dust containment exposes you to the same hazard professional crews are trained and equipped to control.
Professional crews manage this with source-capture sanding, a mechanical sander connected to a HEPA-filtered vacuum, plus plastic containment at doorways and floor protection laid before any sanding begins. That combination is why a pro job is often a one-room cleanup instead of a whole-house dust event. The EPA's guidance on indoor air quality during renovation notes that renovation activities can release particulates and, in older homes, disturb materials that should be handled carefully.
When to DIY vs. when to call a pro
Some repairs are genuinely DIY-friendly and some are not. Use the damage itself as the decision input:
| Damage type | Typical DIY outcome | When to call a pro |
|---|---|---|
| Nail holes, small dings under 1/2 inch | Patch kit works; texture match is the only real risk | If the wall has a heavy texture you cannot replicate |
| Cracks under 1/8 inch, no pattern | Spackle and paint can hold | If the crack runs diagonally from a corner or door frame |
| Holes 1-6 inches | Doable with a California patch, but feathering is hard | If the hole is near a corner, ceiling, or light fixture |
| Cracks that widen over time | Will return through any paint film | Always, this is a movement or structural signal |
| Water stains, soft or crumbly board | Paint will not hide swelling or stain bleed | Always, the substrate usually needs removal |
| Any visible mold growth | Disturbing it spreads spores | Always, containment and remediation come first |
Texture matching is where DIY repairs most often fail: a wrong texture is visible no matter how well you painted. The matrix above is the shortcut, a hole or crack with no pattern is reasonable to DIY; a symptom such as widening, staining, softness, or mold is not a finishing job, and no amount of prep will make it one.
Time and Cost Efficiency: What a Drywall Repair Cost Estimate Really Shows
A drywall repair cost estimate is not just a number. It is a breakdown of labor, materials, access, and finishing time, and reading it correctly tells you whether a quote is realistic or a lowball that will grow.
Most homeowners focus on the bottom line. The line items matter more. A professional estimate typically separates:
- Assessment and surface preparation, including removal of loose or damaged material
- Patching and joint compound application, often across multiple passes with drying time between
- Sanding and dust cleanup
- Priming and texture matching
- Final inspection
A quote that lists only "patch and paint" usually means prep work is not included, and prep is where durability comes from.
The real efficiency gain from hiring a pro is not speed on the day. It is avoiding the second repair. A patch that fails in six months costs you the original repair plus a redo, and that math never favors DIY.
Expertise and Professional-Grade Tools for a Seamless Finish
A seamless finish comes from the tooling and the hand behind it. Professional drywall finishers use wide taping knives, corner tools, and mechanical sanders that homeowners do not own, and the difference shows in the final surface.
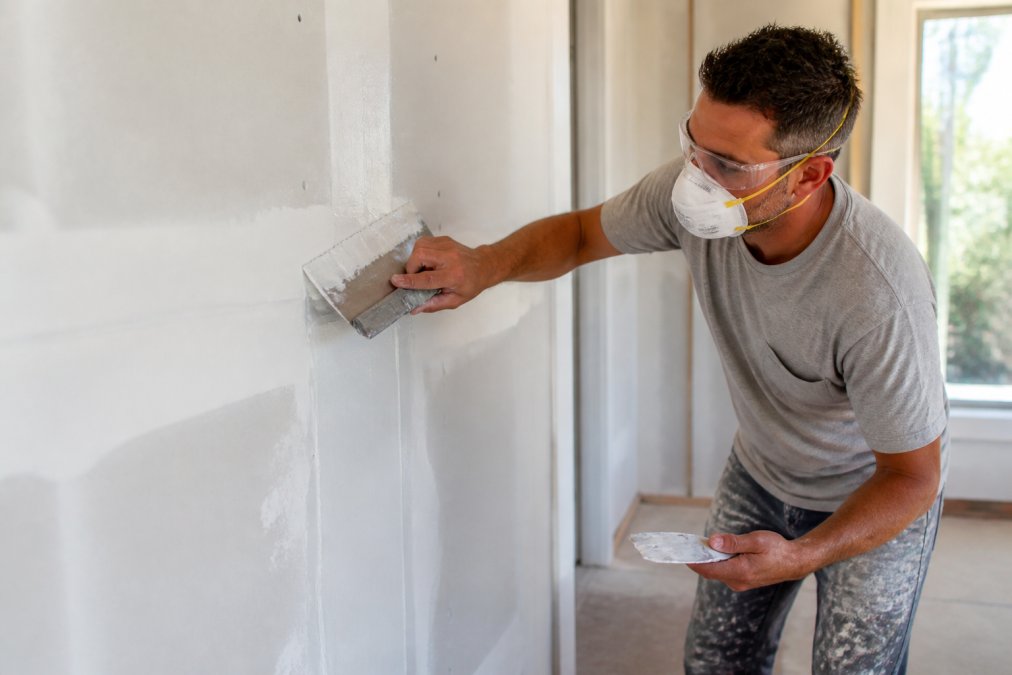
The tools matter, but technique matters more. Feathering compound beyond the patch edge, so the transition is gradual rather than abrupt, takes repetition to learn. A repair can be structurally sound and still look wrong because the feathering was too tight.
Workmanship quality also depends on knowing when a wall problem is bigger than it looks. A hairline crack in a corner is often a drywall crack; a crack running diagonally from a door frame is often a structural signal. Experienced finishers flag the difference before covering it up.
Safety Protocols and Drywall Dust Management
Drywall dust management is the part of the job homeowners underestimate most. Sanding joint compound releases fine particulate that travels through the home, settles into electronics, and coats surfaces far from the work area.
Professional crews handle this with containment: plastic sheeting seals doorways, floor protection goes down before sanding, and mechanical sanders attach to HEPA-filtered vacuums that capture dust at the source. Dust containment is the difference between a one-room job and a whole-house cleaning.
There is a health dimension here too. The EPA's guidance on indoor air quality during renovation notes that renovation activities can release particulates and, in older homes, disturb materials that should be handled carefully. That is a real reason to think twice before sanding a wall yourself without containment.
Safety protocols also cover the work itself: respiratory protection, eye protection during sanding, and safe material handling. Skilled labor means working safely, not just fast.
Long-Term Durability and Increased Property Value
Durable repairs protect property value in a way cosmetic patches cannot, and the mechanism runs through the inspection and appraisal process rather than aesthetics alone. Buyers and inspectors notice wall condition, and recurring cracks or visible patches read as deferred maintenance, a signal that other systems may have been deferred too.
Long-term durability comes from three things: correct substrate preparation, joint compound applied in multiple thin coats, and adequate curing before finishing. Each is a place where DIY shortcuts show up months later. A patch applied in one thick coat instead of three thin ones will shrink, crack, and telegraph through paint within a heating season.
How wall condition shows up in an inspection report
A home inspector walks the property and documents observable defects. Wall and ceiling condition is part of that walkthrough, and the findings that matter most suggest an underlying cause:
- Diagonal cracks at door and window corners are commonly noted as possible movement or settlement indicators, which prompts a buyer to request further evaluation.
- Staining or discoloration on ceilings and walls is documented as a possible moisture history, even when the surface is dry at inspection.
- Crumbling or soft drywall near plumbing fixtures or exterior walls is flagged as a possible active or past leak.
- Visible patchwork with mismatched texture is noted as evidence of prior repairs, which invites the question of what was repaired and why.
None of those findings are automatically deal-breakers, but each gives a buyer leverage to renegotiate, request a specialist inspection, or walk. A repair done properly, cause addressed, substrate replaced where needed, finish blended, removes the finding from the report entirely.
The appraisal side of the same equation
Appraisers compare the property against recent comparable sales and adjust for condition. Wall and ceiling condition feeds into the overall condition rating: a home rated average or above supports the appraised value, while visible deferred maintenance can rate below average and compress the value the lender will support. For a seller, that compression can exceed the cost of the repair by a wide margin.
Why the upfront cost gap narrows
The upfront cost gap between a DIY patch and a professional repair narrows fast once you factor in a redo. A patch that fails in six months costs the original repair plus a second one, which usually costs more because the failed patch must be removed first. Add the inspection and appraisal effects above, and the math rarely favors the shortcut.
Here is how the options compare on the factors that actually predict whether a repair holds and how it reads to a buyer:
| Approach | Typical Strength | Main Risk | Best For |
|---|---|---|---|
| DIY patch kit | Small nail holes, quick fixes | Cracks return, visible texture mismatch, possible inspection flag | Minor cosmetic touch-ups |
| Handyperson | Small to medium holes | Variable finishing skill | Simple, single-wall repairs |
| Marketplace platform | Fast booking, hourly pricing | Drying time billed hourly, limited finishing depth | Small patches on a tight timeline |
| Professional drywall and painting service | Seamless finish, texture matching, dust control, documented cause | Higher upfront cost | Water damage, larger repairs, pre-sale prep |
The durability question and the value question are the same question asked at different times. A repair that holds does not appear in an inspection report, and one that does not appear in a report does not cost you at the negotiating table.
Handling Complex Damage: Water, Mold, and Structural Issues
Complex damage is where professional drywall repair services stop being optional. Water damage restoration, mold remediation, and structural issues each require assessment before repair, because covering the symptom makes the underlying problem worse.
Water damage is the clearest example. Drywall that has been wet loses structural integrity even after it dries, and paint will not hide the swelling or the stain bleed-through. The material usually needs removal and replacement, not patching. The CDC's guidance on mold cleanup after water damage recommends addressing the moisture source and removing affected porous materials rather than painting over them, because mold returns wherever moisture remains.
Mold remediation adds another layer. Disturbing mold growth without containment spreads spores through the home. This is not a job for a shop vac and a mask.
Structural issues are the third category. Sagging ceilings, cracks that widen over time, and damage near load-bearing walls all point to problems a patch will not solve. A professional assessment tells you whether you are looking at a finishing job or a repair job, and that distinction changes the entire scope.
Conclusion
The hardest part of drywall repair is not the patching. It is knowing when a wall needs more than a patch, and doing the prep work that makes a repair disappear under paint.
Always Pro Painters builds every project around a clean foundation for paint, with detailed surface preparation, proper dust containment, and a final walkthrough to confirm the finish meets your expectations.
Get started with Always Pro Painters and turn damaged walls into a surface that looks untouched. Request your free estimate today.
Frequently Asked Questions
How much should someone charge for drywall repair?
Pricing depends on the size and complexity of the damage, ceiling height, and whether texture matching is needed. A small patch might take an hour, while a large hole or water-damaged section could require multiple visits. Always Pro Painters provides free estimates based on your specific project. Request a quote to get an accurate drywall repair cost estimate for your home.
What are the signs that drywall needs professional repair?
Watch for cracks that reappear after patching, soft or crumbly areas, brown water stains, bubbling paint, or a hollow sound when you tap the wall. These signs often point to moisture behind the surface or a structural issue that a simple patch won't fix. A professional can diagnose the cause and recommend the right repair before you paint.
Can a painter perform drywall repairs before painting?
Yes, many painting companies offer drywall repair as part of their prep work. Always Pro Painters handles patching, sanding, and priming before any paint goes on the wall. This integrated approach saves you from hiring separate contractors and ensures the repaired area is properly sealed and ready for a uniform finish.
How does professional drywall repair impact home value?
Flawless walls signal a well-maintained home to buyers. Cracks, holes, or uneven texture can raise doubts about hidden problems, potentially lowering offers. Professional repairs create a smooth, paint-ready surface that improves interior aesthetics and can support a higher resale price. It's one of the most cost-effective ways to prepare a home for sale.