 ultimate-guide
Interior Painting: A Complete Guide to Prep, Process & Costs
Table of Contents
- Interior Painting Fundamentals
- How to Prep Walls for Painting
- Drywall Repair Before Painting
- Best Interior Paint Finishes for High Traffic Areas
- How Long Does Interior Painting Take
- Step-by-Step Interior Painting Process
- Estimating Interior Painting Costs
- Frequently Asked Questions
Last Updated: September 17, 2026
Interior Painting Fundamentals
Interior painting transforms a space faster than almost any other home improvement project. But the difference between a paint job that lasts five years and one that looks fresh for a decade comes down to preparation, not the paint itself. At Always Pro Painters, we've seen countless homeowners spend money on premium paint only to have it fail because the foundation wasn't solid.
Interior painting involves more than rolling color onto walls. It requires understanding surface conditions, selecting the right finish for your space, and executing a process that accounts for everything from humidity to lighting. The best results come from treating preparation as seriously as the painting itself. This is especially true in high-traffic areas where walls take daily wear.
The process typically breaks down into three phases: prep work, actual painting, and quality checks. Each phase matters equally. Skip prep and your paint won't adhere properly. Rush the painting and you'll see streaks, drips, and uneven coverage. Neglect the final walkthrough and you'll miss spots that need touching up.
How to Prep Walls for Painting
Preparation determines whether your interior painting project succeeds or fails. Most homeowners underestimate this phase, which is why many DIY attempts look noticeably different from professional work. The wall condition you start with directly affects how the paint adheres, how long it lasts, and how good it looks.
Surface Preparation and Cleaning
Start by clearing the room. Move furniture to the center and cover it with plastic sheeting. Remove outlet covers, light switch plates, and any wall-mounted fixtures. This takes time, but it prevents paint splatters on items you want to keep clean.
Next, clean all surfaces thoroughly. Dust accumulates on walls more than most people realize. Use a damp cloth or TSP (trisodium phosphate) solution to remove dust, dirt, and grime. Pay special attention to baseboards and areas near doors where hand oils accumulate. Dirty walls won't accept primer or paint evenly. The paint may peel or bubble in spots where contamination sits beneath the surface.
For glossy or semi-gloss surfaces, light sanding with 120-grit sandpaper improves adhesion. You don't need to sand aggressively, just enough to dull the shine. Wipe away all dust with a tack cloth before priming. A tack cloth removes fine particles that would otherwise get trapped under your paint.
Patching Holes and Cracks
Holes and cracks require different approaches. For small nail holes and minor damage, use spackling compound. Apply it with a putty knife, overfill slightly, then sand smooth once dry. For larger holes (more than a quarter-inch), use drywall patch kits or joint compound in multiple coats.
Cracks in walls often indicate settling or moisture issues. Fill them with caulk designed for wall cracks, not silicone caulk. Paintable caulk remains flexible and won't crack again as the house settles. Smooth caulk lines with a wet finger before it dries. Once dry, sand lightly and prime before painting.
Don't assume all cracks are cosmetic. If cracks are wider than an eighth-inch or appear in patterns, they may signal structural movement. Address the underlying cause before painting over them.
Drywall Repair Before Painting
Drywall damage requires repair before interior painting can begin. Small dings and dents are common in older homes. Larger damage needs proper patching to prevent visible seams after painting.
For damage larger than two inches, use a drywall patch. Cut the damaged area into a square or rectangle, then cut a patch slightly larger. Secure it with joint compound and tape, then apply additional coats of compound. Each coat should be wider than the last, feathering the edges so the patch blends seamlessly. Sand between coats with 120-grit or finer sandpaper.
The goal is creating a smooth transition that primer and paint won't reveal. This typically requires three coats of joint compound plus sanding. Patience here prevents visible patch lines after painting.
Water damage to drywall often requires replacement rather than repair. If drywall feels soft or crumbles when touched, cut out the damaged section and install new drywall. Address the moisture source before painting, or the problem will return.
Best Interior Paint Finishes for High Traffic Areas
The sheen level you choose affects both appearance and durability. Different finishes serve different purposes, and high-traffic areas demand finishes that withstand cleaning and wear.
Understanding Sheen Levels
Paint sheen refers to how much light the finish reflects. The main options are flat, eggshell, satin, semi-gloss, and gloss. Each has distinct advantages and trade-offs.
Flat finishes absorb light and hide imperfections well. They're ideal for ceilings and low-traffic areas. However, flat paint is difficult to clean and shows fingerprints easily. Avoid flat finishes in kitchens, bathrooms, or hallways where walls get touched frequently.
Eggshell finishes offer a subtle sheen with good washability. They work well in living rooms and bedrooms where you want a softer appearance than satin but better durability than flat. Eggshell hides minor wall imperfections while remaining easy to wipe clean.
Satin finishes provide noticeable shine and excellent durability. This is the best choice for high-traffic areas, kitchens, and bathrooms. Satin paint resists moisture and cleans up easily. The slight sheen adds visual interest without appearing plasticky.
Semi-gloss finishes offer maximum durability and shine. They work best on trim, doors, and cabinets rather than walls. Semi-gloss reflects light significantly, which can emphasize wall imperfections if the surface isn't perfectly smooth.
Gloss finishes are rarely used on walls. They're primarily for doors, cabinets, and specialty applications where maximum durability and shine matter most.
For most interior walls, satin or eggshell finishes strike the best balance between appearance and performance. High-traffic areas absolutely demand satin or semi-gloss for durability.
Eco-Friendly and Low-VOC Paint Selection
VOC stands for volatile organic compounds. These chemicals evaporate as paint dries and can affect indoor air quality. Low-VOC and zero-VOC paints minimize these emissions, making them better for health and the environment.
Low-VOC paints perform as well as traditional paints for most applications. They dry at similar rates, provide comparable coverage, and offer the same color range. The main difference is reduced odor and fewer chemical emissions during and after application.
Zero-VOC paints contain no added VOCs, though trace amounts may be present from colorants. They're the best choice if you're sensitive to paint fumes or painting in occupied spaces. Zero-VOC options have expanded significantly in recent years, making them accessible for most interior painting projects.
The environmental benefit extends beyond application. Low-VOC paints reduce air pollution during manufacturing and disposal. If sustainability matters to you, choosing low-VOC or zero-VOC finishes aligns your interior painting project with environmental responsibility.
How Long Does Interior Painting Take
The timeline for interior painting depends on room size, surface condition, and the number of coats needed. Understanding realistic timeframes helps you plan around the project and manage expectations.
A typical bedroom takes one to two days for a professional crew. This includes prep work, priming, and two coats of paint. A living room or large open space might take two to three days. Kitchens and bathrooms take longer due to trim work and the need to work around fixtures and appliances.
Prep work often takes as long as the actual painting. Surface preparation, patching, and cleanup can easily consume half the total project time. This is why rushing prep work leads to poor results. Professionals allocate significant time to this phase because they know it determines the final outcome.
Drying time between coats affects the schedule. Most paints dry to the touch in two to four hours, but recoating typically requires waiting four to eight hours. Temperature and humidity influence drying times. Cool, humid conditions slow drying significantly.
Always Pro Painters schedules interior painting projects with realistic timelines that account for proper prep and drying time.
Step-by-Step Interior Painting Process
The actual painting follows a specific sequence. Cutting in comes first, then rolling walls and ceilings. Understanding this process helps you appreciate why professional results look different from DIY attempts.
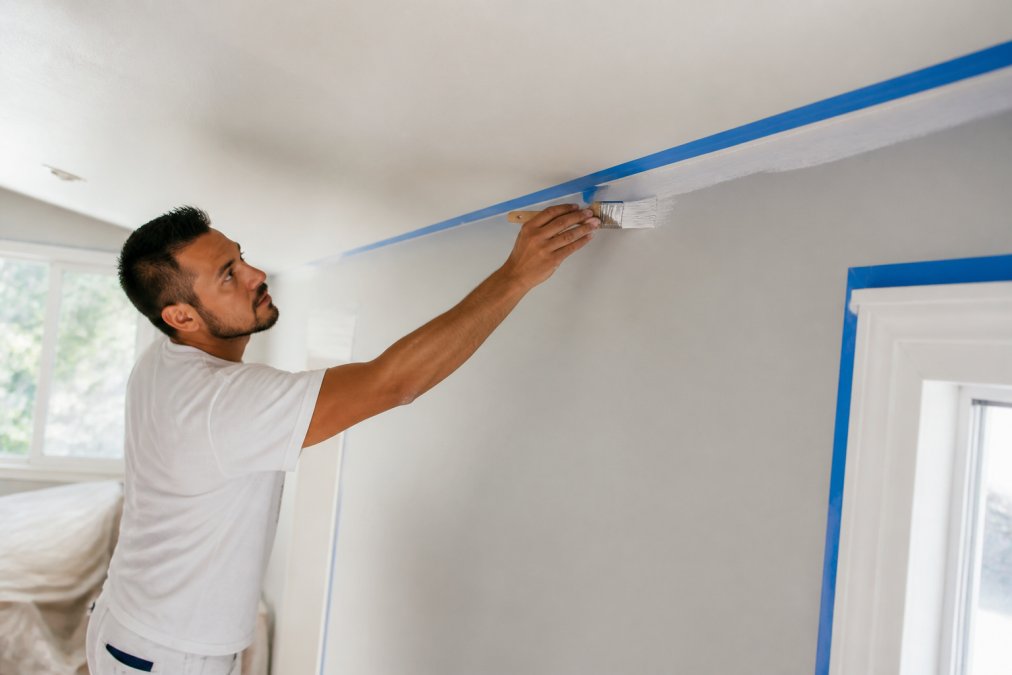
Cutting In and Using Painter's Tape
Cutting in means painting a two to three-inch border along edges, corners, and trim before rolling the main wall area. This creates clean lines and ensures even coverage where the roller can't reach.
Rolling Walls and Ceilings
Paint ceilings before walls. Ceiling paint drips down, and you'll cover these drips when you paint walls. Use a roller with an extension pole for ceilings. This beats standing on a ladder for hours.
Troubleshooting Common Painting Mistakes
Uneven coverage usually results from insufficient paint on the roller or rolling too fast. Reload your roller frequently and roll slowly enough to work the paint into the surface.
Estimating Interior Painting Costs
Cost estimation requires understanding what drives pricing. Materials, labor, and project scope all factor into the final bill. Knowing what influences cost helps you evaluate quotes accurately.
Labor Costs and Paint Coverage Rate
Labor typically represents 60-70% of the total interior painting cost. The remaining 30-40% covers materials including paint, primer, tape, drop cloths, and other supplies. This ratio shifts based on project complexity and surface conditions.
Frequently Asked Questions
What is the average cost to paint an interior room?
Interior painting costs depend on room size, wall condition, paint quality, and labor rates. Pricing varies based on surface preparation needs, number of coats required, and whether trim or ceilings are included. For an accurate estimate tailored to your space, contact Always Pro Painters for a free quote that reflects your specific project scope and timeline.
How important is surface preparation before interior painting?
Surface preparation is critical for a lasting, professional finish. Proper prep work includes cleaning walls, filling holes and cracks with spackle or wood filler, sanding rough areas, and applying primer where needed. Skipping these steps leads to poor paint adhesion, visible imperfections, and premature peeling. Quality prep work is the foundation of a solid finish that stands up to daily wear.
What is the best paint finish for high-traffic areas like hallways and kitchens?
Satin and semi-gloss finishes perform best in high-traffic spaces because they resist scuffing, stains, and moisture better than flat or matte finishes. Satin offers a subtle sheen that hides minor imperfections while remaining durable and cleanable. Semi-gloss provides maximum durability for areas prone to splashes or frequent cleaning. Your choice depends on lighting conditions and the specific wear patterns in your space.
How long does a professional interior painting project typically take?
Project duration depends on square footage, surface condition, and prep work required. A single room may take 2-4 days, while a full house interior typically takes 1-2 weeks. This timeline includes surface preparation, primer application, multiple topcoats, and final cleanup. Always Pro Painters provides a detailed timeline during the estimate process to ensure your project fits your schedule, including options for working around business hours if needed.