 how-to
Clean Foundation for Paint: Property Development Guide
Table of Contents
- Why Foundation Preparation Matters Before Painting
- Assessing Your Concrete Foundation: Damage, Moisture, and Material Type
- Cleaning Concrete Before Painting: Removing Dirt, Debris, and Loose Paint
- Surface Repair and Preparation: Cracks, Peeling, and Primer Application
- Best Paint for Concrete Foundation: Selecting the Right Coating
- Concrete Paint Drying Time: Weather, Conditions, and Application Timing
- Project Planning and Cost Considerations for Property Development
- Frequently Asked Questions
Last Updated: October 10, 2026
Why Foundation Preparation Matters Before Painting
Painting a foundation without proper preparation causes peeling, cracking, and failure within months. The difference between a durable finish and deterioration comes down to how thoroughly you prepare a clean foundation for paint before the first coat goes on.
A proper clean foundation for paint requires removing dirt, loose paint, efflorescence, mildew, and repairing structural damage. Quick pressure washing alone is insufficient. Without proper prep, water penetrates behind the paint, causing blistering, peeling, and deterioration.
A properly prepared foundation holds paint longer, looks sharper, and protects your investment, essential for projects that must pass inspection and retain value.
Assessing Your Concrete Foundation: Damage, Moisture, and Material Type
Assessment before cleaning is critical. Moisture conditions, often invisible, determine whether paint will adhere or fail within months.
Visual and Structural Inspection
Walk the perimeter in daylight. Look for cracks, spalling, water stains, peeling paint, and efflorescence (white, chalky salt deposits). Touch the surface, if it feels soft or crumbly, the concrete is deteriorating and needs repair before painting.
Cracks wider than 1/8 inch allow water penetration, causing blistering and peeling. Hairline cracks can be sealed, but larger cracks may indicate foundation movement or drainage failure requiring repair before painting.
Moisture Testing and Vapor Transmission
Moisture is the silent killer of foundation paint. Developers often focus on paint while ignoring water management underneath.
Perform a simple moisture check: tape a plastic sheet (12 inches square) to the foundation for 24 hours. Condensation on the underside indicates the foundation is releasing moisture, a critical warning sign.
Use a concrete moisture meter for precise assessment. Readings above 3 lb/1,000 sq ft/24 hr indicate excessive moisture where standard paint will fail.
Check soil drainage around the base. If water pools against the foundation or slopes toward it, correct the problem, typically by regrading, installing a French drain, or extending downspouts, before painting begins.
Concrete Material and Condition Assessment
Concrete composition varies. Porous concrete absorbs water readily; denser concrete resists it. This affects primer and paint selection.
If previously painted, inspect for peeling, chalking, or blistering. Previous paint failure indicates moisture or adhesion problems that must be solved before repainting.
For poured concrete, fill form lines, bug holes, and honeycombing before painting. For concrete block, seal or repoint deteriorated mortar joints to prevent water infiltration.
When to Postpone Painting
If your assessment reveals any of the following, postpone painting and address the underlying issue first:
- Moisture readings above 3 lb/1,000 sq ft/24 hr
- Active water seepage or standing water against the foundation
- Efflorescence that returns within days of cleaning (indicates ongoing moisture migration)
- Mold or mildew that reappears quickly (indicates persistent dampness)
- Structural cracks wider than 1/4 inch (may indicate foundation movement)
- Soil grading that slopes toward the foundation
Painting over these conditions will result in peeling, blistering, and failure within 1-3 years. For property development projects with resale timelines, addressing moisture first protects your investment and avoids costly warranty claims or buyer disputes.
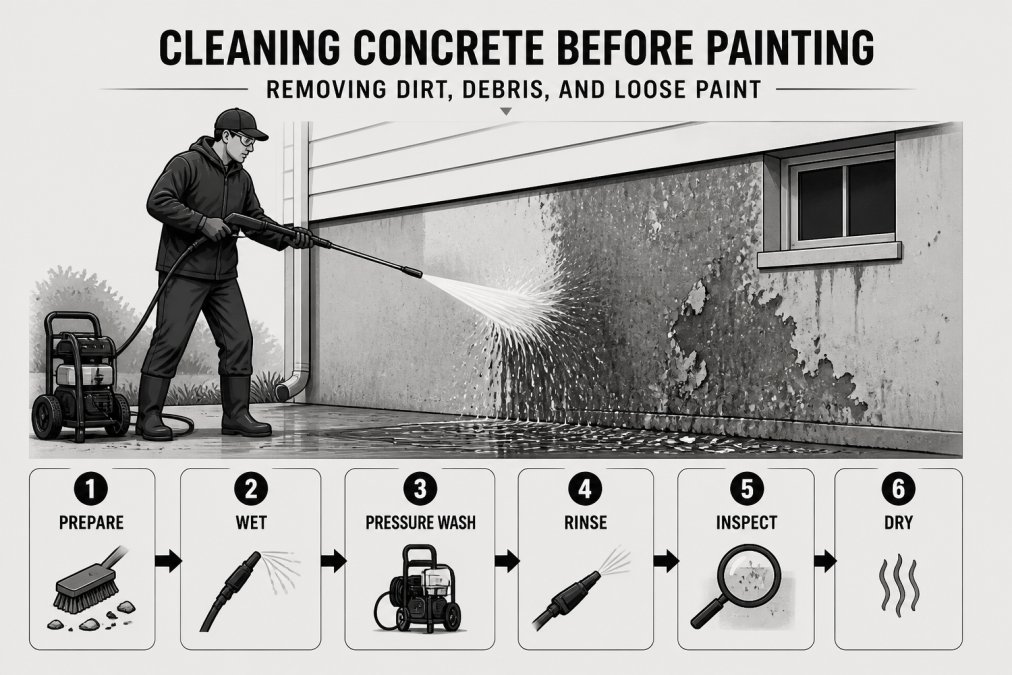
Cleaning Concrete Before Painting: Removing Dirt, Debris, and Loose Paint
Cleaning is the foundation of the entire project. A thorough clean removes contaminants that prevent paint adhesion and ensures a durable finish.
Pressure Washing and Manual Cleaning Methods
Use a pressure washer set to 2,500-3,500 PSI for concrete. Higher pressure damages softer concrete. Start at the top and work downward, maintaining consistent nozzle distance and angle.
Don't rely on pressure washing alone. After drying (24 hours minimum), use a paint scraper or wire brush to remove any remaining loose paint. This manual work is critical.
For stubborn dirt or algae, apply concrete cleaner, let sit 10-15 minutes, then pressure wash for better results.
Addressing Efflorescence, Mildew, and Stains
Efflorescence (salt deposits) causes paint failure if not removed. Clean with a stiff brush and equal parts white vinegar and water. Scrub, rinse thoroughly, and dry.
Mildew and mold indicate moisture problems. Clean with diluted bleach (1:3 ratio), scrub, rinse, and dry. If mildew returns quickly, fix the moisture issue before painting.
Use concrete degreaser for oil stains and rust-removal products for rust stains. Test all solutions on a small area first.
Surface Repair and Preparation: Cracks, Peeling, and Primer Application
After cleaning, assess damage. Hairline cracks are normal; larger cracks (wider than 1/8 inch) need filling to prevent water penetration and paint failure.
Filling Cracks and Patching Damaged Areas
Use concrete crack filler or epoxy. Clean debris, apply with a putty knife, overfill slightly, then sand smooth once dry.
For spalling or larger damage, use concrete patching compound in layers, drying between applications.
Remove peeling paint completely with a scraper, wire wheel, or grinding disc. Paint won't adhere to old, failing paint.
Applying Masonry Primer for Better Paint Adhesion
Apply a masonry primer after cleaning and repair. It bonds to concrete, seals the porous surface, and improves topcoat adhesion.
Apply primer per product instructions. Most need 24 hours to cure before topcoat. Check the label for overcoating times.
Quality masonry primer reduces topcoat needs and improves durability.
Best Paint for Concrete Foundation: Selecting the Right Coating
Choose paint formulated for masonry or concrete. Elastomeric coatings flex with concrete and resist cracking better than standard latex or acrylic, making them ideal for variable climates or moisture-prone areas.
Satin or semi-gloss finishes are more durable than flat. Glossier finishes shed water better and are easier to clean.
Lighter colors reflect heat and reduce expansion/contraction; darker colors absorb heat and can blister in intense sun. In hot climates, choose lighter colors.
| Paint Type | Best For | Durability | Cost |
|---|---|---|---|
| Elastomeric latex | Variable climates, moisture | 10-15 years | Higher |
| Acrylic latex | Dry climates | 5-8 years | Moderate |
| Epoxy | High durability, chemical resistance | 10-20 years | Highest |
| Masonry sealer | Water protection, breathability | 5-10 years | Moderate |
Concrete Paint Drying Time: Weather, Conditions, and Application Timing
Most concrete paints need 24-48 hours to cure before a second coat. Warm, dry conditions speed curing.
Temperature matters. Don't paint if the temperature is below 50°F or above 85°F. Cold slows drying. Heat can cause paint to dry too fast, trapping moisture and causing blistering. Humidity also affects drying.
Check the weather forecast before you start. A rain event during curing will ruin the job. Plan painting for a dry stretch of weather lasting at least 3-5 days after application.
Apply paint in thin, even coats. Two thin coats perform better than one thick coat. Allow full drying time between coats.
Project Planning and Cost Considerations for Property Development
For property developers, foundation painting is not an isolated task, it is part of a sequenced exterior finishing strategy. Timing, material selection, and labor allocation directly affect project cost, schedule, and final property value.
Sequencing Foundation Painting in the Development Timeline
Foundation painting should occur after structural work and major repairs are complete but before final landscaping and hardscaping. The typical sequence is:
- Foundation inspection and moisture remediation (if needed): 1-3 weeks
- Surface cleaning and crack repair: 3-7 days
- Primer application: 1-2 days (plus 24-hour cure)
- Topcoat application: 1-2 days (plus 24-hour cure between coats)
- Final inspection and touch-up: 1 day
- Landscaping and final grading: After paint is fully cured (48-72 hours minimum)
Do not schedule landscaping or soil work until paint is fully cured. Soil disturbance, mulch installation, or grading changes can damage wet or partially cured paint and reintroduce moisture problems you just solved.
For multi-unit developments, coordinate foundation painting with other exterior work. Paint all foundations before installing siding, trim, or roofing. This prevents paint overspray on finished materials and allows for easier touch-up and repair.
Material Cost Estimates
Material costs vary by foundation size, condition, and paint quality. For a typical single-family residential foundation (approximately 1,200-1,500 linear feet of perimeter, 4-8 feet tall):
Cleaning and Prep Materials:
- Concrete cleaner and degreaser: $30-$60
- Crack filler and patching compound: $40-$80
- Sandpaper, wire brushes, scrapers: $20-$40
- Subtotal: $90-$180
Primer:
- Masonry primer (5 gallons, covers ~250-350 sq ft per gallon): $60-$120
- Subtotal: $60-$120
Topcoat Paint:
- Standard acrylic latex masonry paint (5 gallons): $80-$150
- Elastomeric latex paint (5 gallons, higher durability): $150-$250
- Epoxy or polyurethane (5 gallons, highest durability): $200-$400
- Subtotal: $80-$400 (depending on paint grade)
Total Material Cost (single foundation): $230-$700
For multi-unit projects, material costs per unit decrease due to bulk purchasing and reduced waste. A 10-unit development might achieve 15-20% savings on material cost per unit.
Labor Cost and Time Estimates
Labor is the largest cost component. Prep work, cleaning, scraping, filling cracks, priming, accounts for 60-70% of project time. The actual painting is the remaining 30-40%.
Typical timeline for a single residential foundation:
- Surface assessment and moisture testing: 2-4 hours
- Cleaning and pressure washing: 4-8 hours
- Crack repair and patching: 4-12 hours (depending on damage)
- Sanding and final surface prep: 2-4 hours
- Primer application: 2-4 hours
- Topcoat application (2 coats): 4-8 hours
- Total: 18-40 labor hours
At a typical labor rate of $45-$75 per hour (including overhead), labor cost ranges from $810-$3,000 per foundation.
The biggest variable is surface condition. A foundation in good shape with minor cleaning needs might require 18-25 labor hours. A foundation with heavy mold, structural cracks, or previous paint failure can require 40-60+ labor hours. Always assess each foundation individually and build contingency time (10-15%) into your schedule.
Equipment and Overhead
For in-house crews:
- Pressure washer rental (if not owned): $50-$100 per day
- Scaffolding or lift rental (for tall foundations): $100-$300 per day
- Safety equipment (harnesses, fall protection): $200-$500 (one-time)
For subcontracted work, these costs are typically included in the labor rate.
Paint Selection by Project Timeline and Durability Goals
Your choice of paint affects both upfront cost and long-term maintenance:
Acrylic Latex Paint:
- Cost: $80-$150 per 5-gallon bucket
- Durability: 5-8 years
- Best for: Budget-conscious projects, dry climates, properties with short holding periods
- Maintenance: Repainting every 5-8 years
Elastomeric Latex Paint:
- Cost: $150-$250 per 5-gallon bucket
- Durability: 10-15 years
- Best for: Variable climates, moisture-prone areas, properties held for 10+ years
- Maintenance: Repainting every 10-15 years; better crack bridging reduces prep work on repaints
Epoxy or Polyurethane:
- Cost: $200-$400 per 5-gallon bucket
- Durability: 10-20 years
- Best for: High-traffic areas, chemical exposure, premium developments
- Maintenance: Minimal; excellent adhesion and chemical resistance
For property development, elastomeric latex offers the best balance of cost and durability. The upfront premium ($70-$100 per foundation) is offset by extended service life and reduced maintenance liability after handover.
Multi-Unit Development Cost Scaling
For a 10-unit development with similar foundation conditions:
- Total material cost: $2,300-$7,000 (15-20% bulk discount applied)
- Total labor cost: $8,100-$30,000 (depending on condition and crew efficiency)
- Equipment and overhead: $1,000-$3,000
- Total project cost: $11,400-$40,000
- Cost per unit: $1,140-$4,000
Scheduling all foundations together (rather than individually) reduces per-unit labor cost by 10-15% due to crew efficiency and material waste reduction.
Budget Contingency and Risk Management
Always include a contingency of 15-20% for unexpected conditions:
- Structural damage requiring additional repair
- Moisture issues requiring drainage work
- Mold or mildew requiring specialized cleaning
- Weather delays (rain, temperature extremes)
A $20,000 project should budget $23,000-$24,000 to account for contingencies. This protects your schedule and prevents cost overruns that delay final inspection and handover.
Frequently Asked Questions
How do you clean a concrete foundation before painting?
Start by removing loose paint, dirt, and debris with a wire brush or scraper. Pressure wash the surface at 1500-2000 PSI to remove stubborn grime, mildew, and efflorescence. Allow the foundation to dry completely (24-48 hours depending on weather), then sand any remaining rough spots. For stained or heavily soiled areas, use a degreaser or mildew cleaner, rinse thoroughly, and dry again before priming.
Does a concrete foundation need primer before painting?
Yes. A masonry primer creates better paint adhesion and improves durability on concrete foundations. Primers fill surface pores, reduce water absorption, and help topcoat paint cure properly. Without primer, paint may peel or blister, especially in damp conditions. Choose a primer designed specifically for concrete or masonry to ensure compatibility with your finish coat.
How long should a concrete foundation dry before painting?
After cleaning and repair work, allow 24-48 hours of dry weather before priming. After primer application, wait 4-8 hours before applying topcoat paint, depending on humidity and temperature. Full curing typically takes 7-14 days before the foundation is ready for heavy use or landscaping contact. Check your paint and primer labels for specific drying and curing times.
What type of paint is best for painting concrete foundations?
Elastomeric or waterproof masonry paints perform best on concrete foundations because they expand and contract with temperature changes, resisting cracks and moisture penetration. Acrylic latex masonry paint offers good durability and breathability for exterior foundations. For foundations with active moisture issues, elastomeric coatings provide superior water resistance. Always use a paint rated for exterior masonry or concrete to ensure long-term adhesion and weather protection.